
Air, wind and flight project
age: 7yrs plus
By closely observing, and working out how seeds float and spin in the wind, and the way birds soar and glide in the sky, designers were able to create the first successful airplane wings.
This simple two part science and technology project explores these essential properties of flight – firstly by making a flying spinner, and then turning it into a propeller wind vane.
Making the flying spinner:
The design of this spinner is an abstract version of a spinning sycamore seed – one that flies upwards!


Each wing is set at an angle to the wind and so creates lift as it spins. The long drinking straw adds weight below the wings and so keeps the spinner upright. You can throw it and it will glide gently to the ground spinning as it goes – but it will also fly! The straw allows you to spin the propeller between your hands and, when you let go, it will fly upwards. Or it might go straight down – if you spin it the wrong way! You need to find out which way to spin it: left or right. Younger children will find this quite difficult as it requires some manipulative skill.
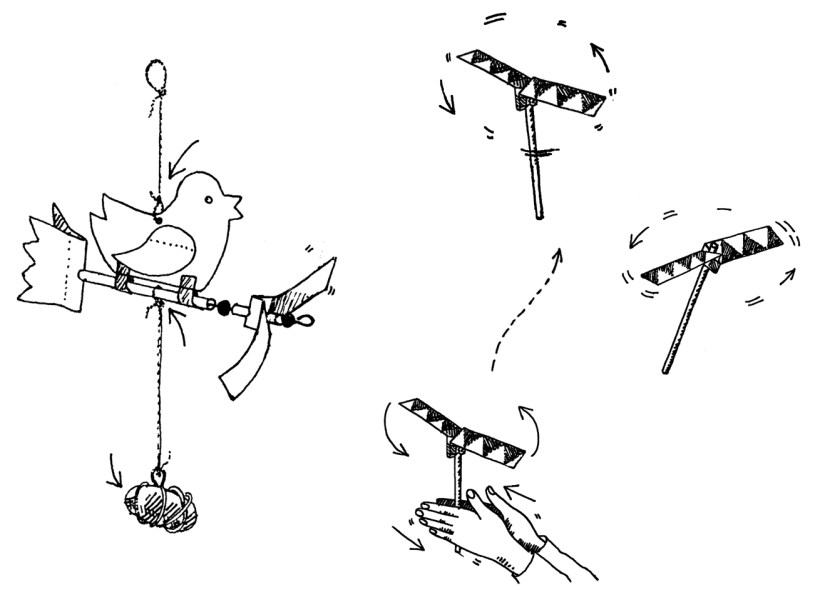
Making the wind vane:
The spinner also works horizontally by pushing a piece of garden wire through the straw and holding it to face into the wind like a whirlygig. The worksheet shows you how to make this into a hanging wind vane which automatically turns towards the wind.


You create your own weather vane design in card and attach it to the spinning mechanism. It needs a small weight hanging on a string to keep it steady.
Things you need to pay attention to:
- Is yours a left handed or a right handed spinner? Should you start with your left hand further away from your body, and draw it towards you, to create the uplifting spin? or the right hand?
- Make the hanging hole to suspend the wind vane, before you attach the weight at the bottom. Slide the weighted string along the straw until the propeller unit is nicely balanced.
- Don’t leave it outside overnight in the damp air.
Other Simple Experiments:
Many lightweight shapes will float and spin in the air. We are all familiar with blowing dandelion clocks, and you can experiment by throwing other winged seeds to see how they float and spin. Put a bit of sticky-tack, or a paper clip, on the stem of a feather and throw that in the air. Compare this with dropping simple cut out paper shapes – squares, long thin strips, and curvy and wavy shapes. See how fast they spin and how far they travel when you drop them (standing at the top of some stairs is a good idea). These act in the same way as confetti.


Its good to know:
Seeds and paper are quite light – how do heavy things, like birds or airplanes, fly? There are many complex considerations – the shape, air pressure, drag, and speed – all these affect how successfully something will fly.
The essential features of a wing is it’s special shape, which creates ‘lift’ as it moves through the air. The wing is curved on top, so the air travels further over the curve than it does across the straight underside. The air has to go faster over the top so that it meets the air travelling along the bottom surface at the same time. This makes it thinner, creating a lower air pressure. The higher pressure on the underside effectively pushes the wing upwards, creating ‘lift’.

You can make this aerofoil wing as a simple model to see this in action
Examples on how to make this aerofoil can be found online at:
Arvind Gupta’s ‘toys from trash’ – website/pinterest http://www.arvindguptatoys.com/toys/aerofoil.html
A good science book:
101 Great Science Experiments by Neil Ardley – publ. by DK – 2014 ISBN-10:1465428267
Special materials/tools you will need:
- thin card
- medium thickness garden wire and craft snips
- two small beads that will turn easily on the wire
- drinking straws
- a pebble weight
Click to view PDF worksheet

